by Gary Edwards, MBCA Peachtree Technical Advisor
I recently wrote about transmission limp mode in a 1997 Mercedes S500 Coupe (C140). I had first changed the connector sleeve, then the transmission control module. The car kept returning to transmission limp mode. It was time to replace the conductor plate. This isn’t unusual for one of these transmissions and some consider conductor plate replacement to be a routine maintenance item. I think that 722.6 transmissions are often replaced when all that’s required is a new conductor plate.
In my case, the other hints were the fault codes. I had consistent 013 and 109, both of which call out the transmission RPM Sensor N3 signal defective. The N3 RPM sensor is on the conductor plate. So, conductor plate replacement was clearly the next thing to do.
There are plenty of threads on the forums covering how to replace the conductor plate, so I’m not going to provide a detailed procedure, I’ll just cover my observations on what I learned. As with all transmission work, cleanliness is vital; the hydraulics in the transmission are totally intolerant of any dirt, contaminants or particulates.
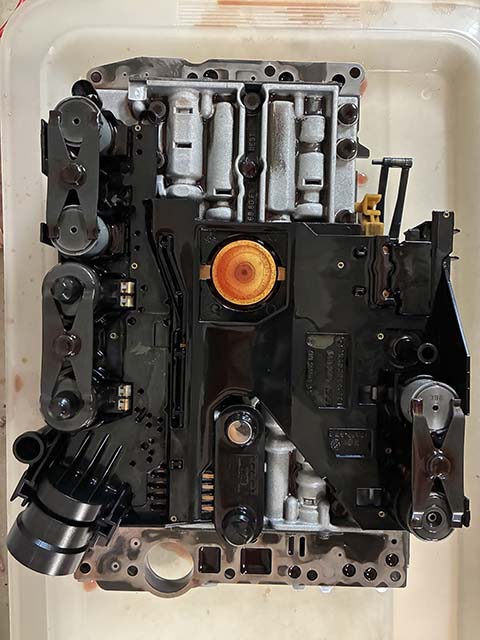
The conductor plate is located on top of the valve body. The valve body is what you see when you remove the transmission pan. It is held on by 9 (or perhaps 10 in some variants) Torx headed bolts. One is a bit hard to see – I thought I had all the bolts backed off and couldn’t get the valve body loose – from where I was standing, I could not see the last bolt. The torque is low, only 8 nm, but several of mine were very tight and one stripped. I had no trouble drilling it out, but I was certainly nervous. I used a left hand drill bit the size of the bolt head and it took no time to remove the bolt head. The remaining portion of the bolt was easy to remove after the valve body was off.
Before you can remove the conductor plate, however, you must first remove the connector sleeve. This is the “tunnel” through the transmission case that allows the cable from the transmission control unit to plug into the conductor plate. Removal is trivial, you just remove any heat shielding, rotate the locking ring, unplug the connector, then loosen the bolt in the center of the connector sleeve, and remove it. It’s also a good idea to disconnect the battery any time you unplug the cables leading to a control unit, and you’ll certainly need to drain the transmission fluid and remove the pan to proceed. If you drain the fluid before you remove the conductor sleeve, you won’t have any fluid flowing out the conductor sleeve opening when you remove it.
When removing the conductor plate, it is helpful to leave several of the bolts installed until you are fully ready to remove it. It’s somewhat heavy and it is slick with transmission fluid. Pay close attention to the way the linkage pieces fit in at the left rear of the transmission to ensure you reinstall in the same position.
Once on your (very clean) workbench, you have a little work to do to replace the conductor plate. There are supposed to be plastic covers over the shift solenoids (the plastic covers were missing on my transmission), you remove these and remove the brackets retaining the shift solenoids. You then remove each shift solenoid (keeping track of where they go). After that, you can snap off the old conductor plate. Since you have removed the shift solenoids, this is a good time to check that resistance of each is in specification, though if you don’t have any shift solenoid fault codes, they are probably OK.
This presented a great opportunity to check the proper insertion of the dipstick tool. As I discussed in a previous article, the head of the dipstick tool has tangs that engage a narrowed area that is in the conductor plate. I inserted the dipstick till the tangs bottomed out, verified this was correct, and marked the dipstick shaft so I could tell how far it was to be inserted for this specific chassis/engine combination. If you have multiple cars with 722.6 transmissions, I recommend purchasing a transmission dipstick for each chassis/engine combination and marking each one to indicate the correct insertion depth.
Once all buttoned up, refill the transmission fluid before starting the car. It’s a good idea to measure the amount of transmission fluid drained out so you have a better idea of how much to put back in. Also, you must clear the transmission fault codes to get it out of limp mode – if you don’t do this it will still be in limp mode even with a new conductor plate.
I was feeling good about finishing this job when I noticed the box containing the new filter still sitting on the workbench. Fortunately, I had not refilled with fluid yet, so re-removing the pan and fitting the filter was easy. If I do it again, I’ll want to have a set of the conductor plate bolts and shift solenoid O-rings on hand and if I go back inside this car’s transmission, I’ll attempt to come up with the plastic covers for the solenoids. You’ll certainly need a transmission pan gasket, connector sleeve and filter plus plenty of fluid on hand before you start this job.
My other take away from this job is that the conductor plate is continuously bathed in transmission fluid. O-ring leakage in the connector sleeve that allows transmission fluid into the connector plug isn’t going to cause a failure. The failure mode is when the transmission fluid wicks up the cable to the transmission control unit, which is not built to be immersed in transmission fluid. On the 140, the transmission control unit is installed with the connectors on the top, so that fluid wicked up the cable can collect in the plastic case for the control unit, plus when it oozes through the connector it will end up running down the circuit board. Mine had enough fluid in the control module that I had to pour it out, but I think it was still working properly.
When I removed the conductor plate, I could see that the N3 RPM sensor was cracked, and that matched the previous fault codes. Perhaps I should have jumped straight to the conductor plate replacement, but in my experience when the conductor sleeve is leaking and fluid gets to the control unit, weird things can happen. Used control units are cheap and much easier to replace than the conductor plate. The conductor plate replacement sounds imposing but it’s quite straightforward and well within the capability of the home hobbyist.

Looking up at the valve body after removing the pan and filter

Dipstick slightly withdrawn showing the area where it bottoms out in the conductor plate

Dipstick in correct fully inserted position